I’ve been doing several posts on this during the build process. It’s finally done, so its about time I did a big writeup on it… Pictures of the project in progress can be found over here.
The Workbench Project
This is a typically called a “european style” or “german style’ bench. It’s the style associated with Frank Klausz. I had seen Frank’s bench when he came through Austin a few years ago with a wood show. There’s several aspects I like about this style, which I’ll get into later. When my friend and I decided to each make a bench, he had the plans in an article from Woodworker’s Journal.
Here’s some resources I used in the making of this bench:
- “A Traditional European Workbench” by Frank Klausz, Woodworker’s Journal Oct. 2004
- “Workbenches: from Design and Theory to Construction and Use” by Christopher Schwarz (and his blog)
- “Building a Traditional Workbench” – a 60-page online article by Keith Rucker
- All of the various workbench threads that start up in the hand tools forum at woodnet.net
The measurements I used were heavily based off the Frank Klausz article, but I’ll point out the various design changes I made to that plan. It’s a good plan, I found a few dimensions were off. The Keith Rucker article helped a lot on this, even though he uses a a different front vise, the tail vise design is the same. Keith’s article also gave more detailed measurements and a detailed description of all of the processes he used.
Anyone who has read Schwarz’s book probably recognized his influence in the first picture. Yes, I used a lot of southern yellow pine in this bench. I was pretty much sold on the idea after I walked into a Home Depot, looked at the prices of 2×10 boards and figured out that SYP cost about $0.40/board-foot. I used about 110 board feet of pine in this bench, which made the bulk of the top and the legs.
Since I chose an inexpensive wood, I could simplify things and make the top a solid 4″ slab. The Klausz design uses 2.5″ boards for most of the top (which are really hard to find anyway), so my bench has an extra 1.5″ of wood compared to the plans, and the weight that comes with it. This also eliminated a couple of the rails that had to be attached to the underside of the top.
Another change I made from the plans was the back tool tray is removable, which was a tip from Schwarz’s book. The tool tray and the underneath storage were removed for all of the pictures I took. The idea is that if I need to clamp anything near the back of the bench, the tray can be removed to create another clamping option. Holdfasts can also serve this purpose – I have 2 that I bought from Tools for Working Wood, but haven’t drilled the holes for them yet.
I put in a track for a sliding deadman. I haven’t built it yet, but it was recommended in so many places that I decided I wanted it. It’s easier to put the track into the underside of the top before flipping it and adding everything onto the sides and back.
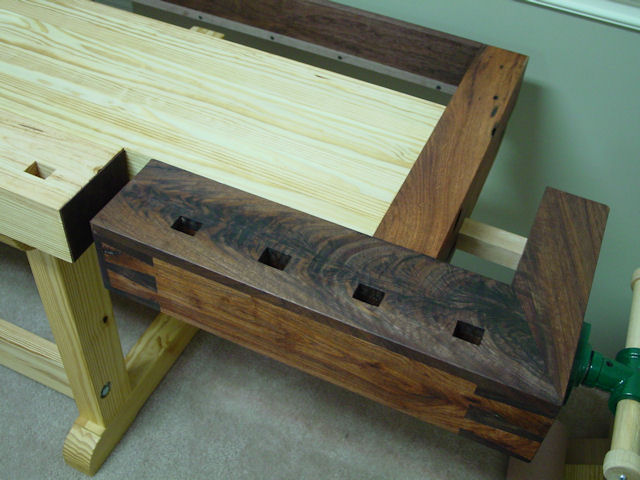
I already talked about the pine. The other woods I used in this bench are mesquite and walnut. I had some mesquite from a woodpile where it had been out in the weather for too long. It was a lot of work recovering the good parts, but that gave me some 12/4 and 16/4 stock. I had to add in a few other pieces to have enough for the bench. I had the walnut already, and it provides some contrast to show off the dovetails.
The Front Vise
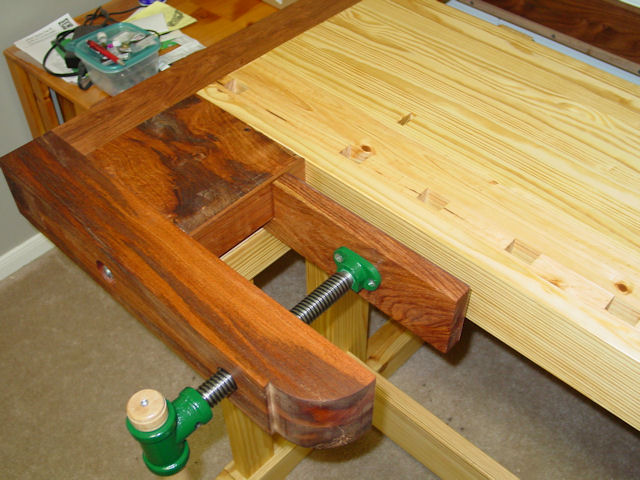
 This design of the front vise is unique to the european style benches. I like this design because there aren’t any vise screws between the 2 clamping surfaces. Other styles of front vises limit the depth of what you can clamp unless you can fit it between the 2 screws, this doesn’t have that limitation. However, this design does require a heavy arm in front of the bench and putting a threaded rod through all of the pieces.
Another thing I like about the vise arm is that the bottom leg extends out underneath it, which adds more stability.
The Tail Vise

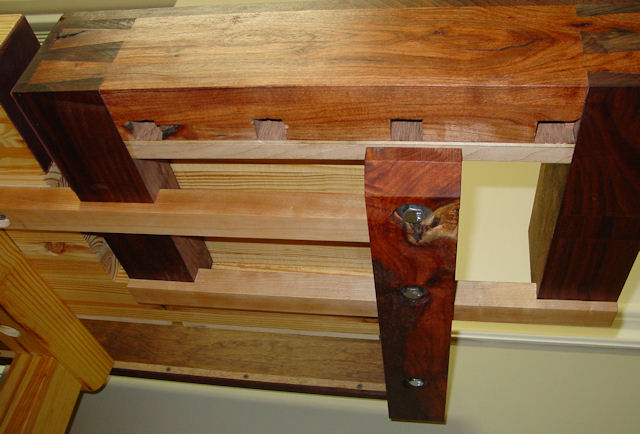
 There’s a lot of tail vises out there. I really like this design but could only explain it by showing what it looks like underneath the bench. If you look underneath, there’s 3 rails supporting it. The furthest back rail is attached to the vise, so all 4 pieces are interlocked and it makes the whole structure absolutely solid. Other designs don’t have any support for the front corner. In addition to these 3 rails, the top board of the vise rides on a shoulder in the endcap, which provides additional support.
With all of these support points, this vise doesn’t use the typical tail vise hardware that has a sliding plate, it only needs a simple screw and nut, which cuts about $80 off the cost.
The drawback to this vise design is it’s complexity. The 3 rails have to be parallel to each other, to the front of the bench, and to the vise screw. If any of those things are out of line, then the vise will bind. I was constantly dry-fitting and measuring to get this right.
Thats all for now, I’ll collect a lot of the in-progress shots taken on my iPhone to this (or maybe a separate article) later.

A work of art. It will provide many years of service.
WOW WOW WOW WOW~
Love the workbench! When I retire…….maybe I can get busy again.
How long did it take you to make it? ?
Keep up the good work!
Doc
Great looking bench. You done yourself proud. I like the looks of the dovetails and the execution of the vises is wonderful. Great job!
Thanks for sharing your website address. I’ll visit the other pics of the bench likely tomorrow.
Regards,
That is one nice labor of love. How many men and small boys does it take to move it?